13 December 2013

Winter Prep: Part 2

In between teaching and grading I have managed to fit in some much-needed sewing. The sewing has been much needed because the projects have had time constraints and for stress release since I have one student who is being a total jerkface. I won't talk about that because thinking about it makes me involuntarily grind my teeth. Instead I will focus on the sewing!

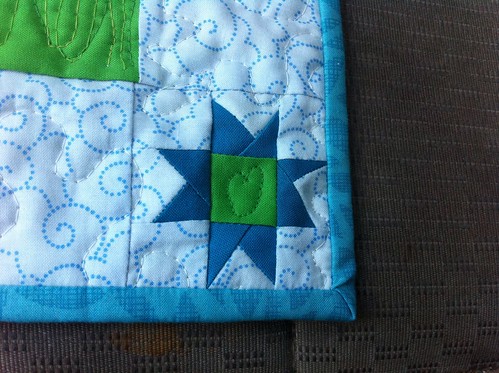
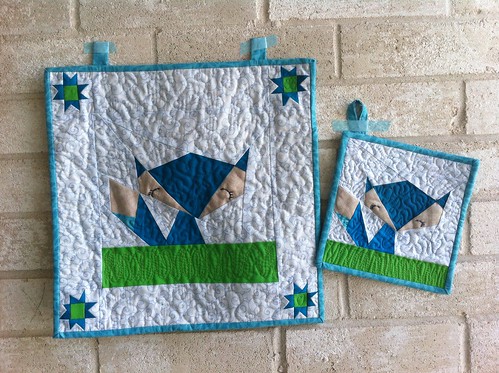
I finished the matching mustache tree potholders for my BFF and I. The piecing process was detailed over here. First off, here is the detail on the star. The thread is metallic so it sparkles a little!


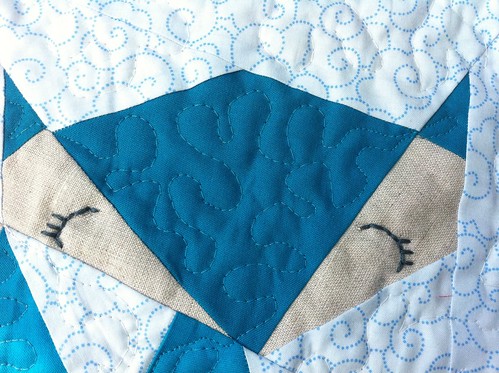
Then there is a close-up shot of the mustache stitching. The photo is at such an extreme angle to show how poofy the mustaches came out! It looks like trapunto (which I have no idea how to do!). The accidental way I pulled this off was by using fusible web applique for the mustaches then by machine quilting around them but not on them. If you want the mustache templates I drew up, let me know and I can send them to you.
Untitled

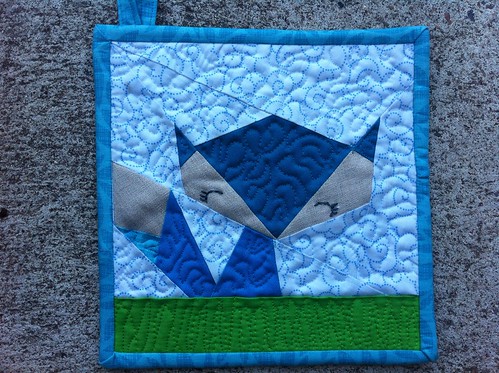
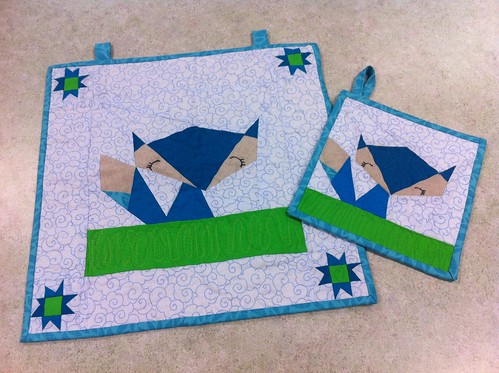
Finally we have an overall shot showing both of them. Mine is the one without the hanging tab.
Untitled

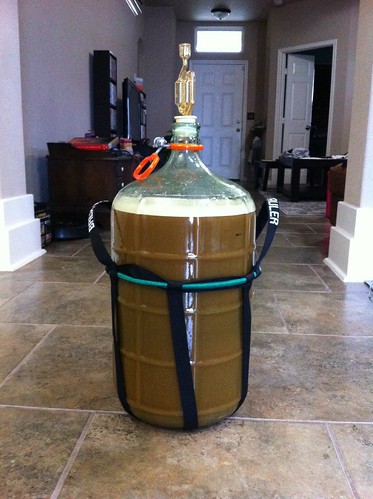
Over the weekend my boyfriend and I were able to fit in some homebrewing! This is a batch of Imperial Red IPA. Yum! Now we just have to wait for it to be ready.
Untitled

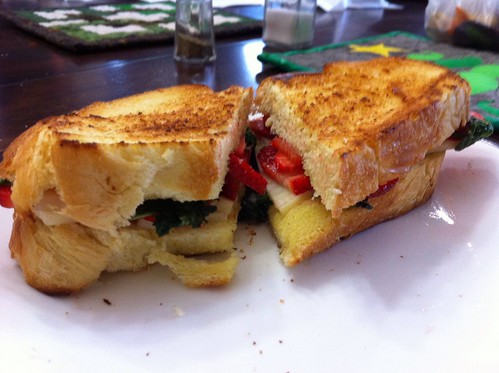
There was also some marathon cooking going on. First off we have these strawberry basil grilled cheese sandwiches which were delicious, though we doubled the basil to ensure we could taste it. The cheese was a little lost, so maybe stronger cheese next time. Recipe over here.
Untitled

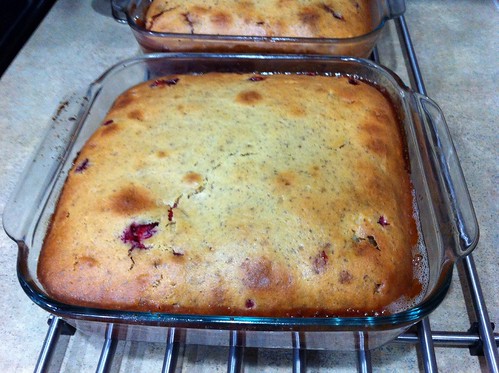
We also made some amazingly delicious caramelized garlic tart. Seriously, this was one of the most delicious quiche things I have ever tasted. It could totally use some veggies though, like spinach or asparagus. The recipe is from Martha Stewart but we didn't use puff pastry for the crust. Instead we used the olive oil pie crust recipe from Vegan Pie in the Sky, which you can find over here. Or you can just buy the book and learn the secret to my peach basil pie!
Untitled

Oh my gosh, it is so gorgeous!


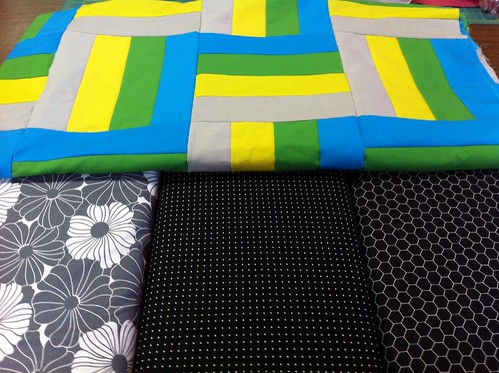
I broke all my rules and took on another commissioned t-shirt quilt. The only commissioned quilts I have ever done are t-shirt quilts, and the only t-shirt quilts I have made are commissioned quilts. Because of this, I don't know if I hate making t-shirt quilts or commissioned quilts. Anyways, here is the initial layout, which was too long and skinny.


So I added some sashing from leftover t-shirt bottoms to make it a little wider and came up with this for the front. Now I just need to quilt and bind it so that I can deliver it in time for it to be given as a Christmas present. 


On a happy albeit unrelated note, Finn, our betta is finally happy! We got him a heater and he loves it. Check out this incredible bubble net he made to show how happy he is! 


The last bit of marathon cooking was pork loin roasted with veggies and mustard gravy (recipe over here). Ooo, this turned out so tasty! Our piece of pork was smaller so it cooked up very quickly.
Untitled

The last bit of holiday prep sewing I have been working has been really fun. For background information, my family is super nerdy and if you put us all in a room together, it is likely that we will start playing Dungeons & Dragons. Because of this, I have an assortment of dice, trinkets and pencils to locate and pack prior to any family function. I really wanted a small bag/pouch thing to hold it all in so it could be contained and more easily packed. While searching for an appropriate bag, I discovered that nearly all dice bags are drawstring which seems silly to me because dice and pencils can fall out the drawstring. So it dawned on me that I could just make a totally awesome zippered pouch!

I decided to use part of a t-shirt for one side (stay tuned because that is staying secret) and a super cool dragon for the other side! The dragon pattern is from the book Spellbinding Quilts which is full of incredible stuff (seriously, you need to get this book. It might as well be called "Harry Potter and LOTR Paper Pieced patterns). I shrunk it down because the original block size was huge. This resulted in so many teeny tiny bits that needed to be paper pieced. It took about 3 hours! Sheesh! Hopefully I can still finish this in time to play D&D for X-mas!


So this is what I came up with. I bought the green/gold fabric in Ketchikan, Alaska while on a cruise with my family. We totally played D&D on the cruise ship (which is not surprising since we have played D&D in Japan and Hawaii). The purple fabric that looks blue was leftover from a baby quilt. I promise it is purple. For some reason, my phone cannot photograph this fabric as purple. My boyfriend's phone can, but the picture wasn't as clear! The same thing happened when I used it in a baby girl quilt. Everyone kept giving me grief for using so much blue in a baby quilt, but it was purple in real life!!
Untitled

I have the dragon sitting in front of me right now, and this is what the purple actually looks like. I promise! 


Anyways, hopefully I can finish everything that needs to be done in time for their respective deadlines. I am completely caught up on grading until I administer final exams and my students submit projects next week. Wow! I actually get a weekend!

06 December 2013

8 Years in the Making

My cousin and her boyfriend fiance are getting married! They have been dating for EIGHT YEARS! They already bought a house together, so they might even be commonlaw at this point, but still, they are getting married!! She is very anti-wedding. When we were kiddos, she and her sister had to be flower girls in a wedding so they both wore frilly little girl dresses. She proceeded to take hers off and drag it through the dirt because she wanted nothing to do with a wedding. Some things never change. They are getting married at the courthouse and then having a small party at a bar/restaurant/bowling alley/arcade (isn't Texas wonderful?).

Naturally I am making a quilt for them! This might seem extravagant since I already made them this quilt when they bought their house.
Housewarming quilt for RoseAnna & Brandon

But my piecing and quilting skills have improved SO much since I made this one that I just have to make another (like I need an excuse to make a quilt, puhlease!). Plus, my cousin has started sewing and is toying with the idea of learning to quilt, so I want to do something really special for someone I love! This is going to be the center of the quilt. Apparently I'm on a Kona solids kick since the last quilt I made was all solids.
Kona solids stairstep/zig zag. Still needs a border.

But this one probably won't end up made entirely out of solids because it needs a border. This quilt is going to be about 72" by 72" or just big enough to cover the top of a king sized bed. Each block is 8" by 8" so I still need to add about an 8" border all the way around. I generally don't like to do borders that large, but it would have looked even sillier to make an extra row of blocks and have a ridiculously thin border.

So now I'm to the picking border fabric stage. I already decided it can't be a a solid or any color that is already in the quilt. Perhaps a charcoal? Well, this is the assortment of fabrics my local quilt shop had to choose from.
Help! Which border fabric is best?

Out of these, I like the blacks. But wouldn't a simple sketch in black & white look great?

Or what about some linen?

Ack! Decisions, decisions! Which one would you pick? 

03 December 2013

Winter Prep: Part 1

It finally got cold here in South Texas for about a week, so it felt like winter. Of course cold for South Texas is 40-50 degrees. Today we are back into the low 80s, but it should be getting cold again this weekend!

Anyways, the cold weather motivated me to work on Christmasy stuff that needed to get worked on. First of which is the tree skirt for my boyfriend's sister. It all started last December when we were at her house while she was decorating her tree. I noticed she didn't have a skirt and inquired about this. She couldn't find one without color and over-the-top holidayness, so I offered to make one.

That means I have been working on this for almost a year! The last time I had even touched this was back in July when I finished the front. You can read all about that over here. 

But the cold weather was a wonderful motivator and I was able to quilt it up and bind it in time to deliver it to her on Thanksgiving! The quilting includes stipple in the grey between the 3D crinkle grey and the blueish grey flower stuff along with stitch in the ditch everywhere else since the batting was super poofy and not very quilting friendly. The grey strips that make up the stars are actually glittery. So much monochromatic goodness!
Tree skirt is done!

I also started working on some matching hot pads for one of my BFFs. She and I are both highly unusual, which probably explains why we get along so well. Anyways, we both love mustaches, so I decided to make us appliqued mustache trees! Does anyone want the mustache applique templates I created? If so, let me know so I can post them.
Untitled

And what would be a Christmas tree without a star on top?? I could have easily made little bitty wonky stars, but when I visualize tree-topping stars, I see 5-point stars. I decided the easiest way to accomplish this was with foundation paper piecing, so I used this pattern and scaled it down to 25%, which ended resulted in 3" unfinished stars. I am fairly proud of those y-seams! [Hilarious side note, when I just went to get the link for the pattern, an advertised pattern on the side menu was for a mustache tree mug rug that doesn't look much like mine. Apparently I am not TOO original.]
3" paper pieced stars!

I also made a batch of Pioneer Woman Cinnamon Rolls. Baking these is my one and only holiday tradition. It also happens to be a super tasty tradition!
Untitled

The cold also made me decide to try my hands at Fair Isle knitting. I can knit, but am incapable of doing anything more complex than squares and rectangles, so this was a big leap. After watching 5 YouTube videos, I managed to make this swatch. FYI: This was my first time knitting in the round, so it got twisted and turned into a mobius strip.
First try at Fair Isle knitting

Have no fear! I casted on (or is cast on present and past tense?) a new set of stitches and managed to not get them twisted, so this new set will eventually make it all the way to scarf. Pictures will be posted when it actually looks like something.

27 November 2013

A Tale of Two Foxes

Way back in August before this crazy over-full-time teaching semester started, I made this little blue fox potholder for my mom. She loves foxes and she loved the potholder... TOO MUCH! She refused to use it because it was just too cute. Ugh.
I made the fox blue because I'd never seen a blue fox before and I wanted to see one.

So I decided to make her a slightly larger wall hanging version so that she could actually take the potholder to her church baking group and show it off like she wanted. Progress was made and I documented over here.

Finally it was ready to be quilted. Since it is for my mom and I love her, I added a secret little heart. Man, my FMQ needs work.
Untitled

But on the up-side, my FMQ is definitely improving. Here is the quilting on the newly made fox's head.
Untitled

And here is the quilting on her predecessor [we decided the foxes were both females]. See how much I have improved!
Untitled

Now here they both are together in a photo so bright you can hardly even see the quilting.
Untitled

And here they both are in a photo where the quilting is overwhelmingly obvious. Apparently I am no good at finding a happy medium. Anyways, I put two loops on the newer version so it can be easily hung on the wall and displayed. It hasn't made it that far though because she is taking it everywhere with her and showing it off. Aww!
Untitled

Not Quite White Vanilla Cupcakes & Cranberry Upside Down Cake

Let's say you want to make some vanilla cupcakes. Or maybe you want to try a sort of non-traditional recipe for the holidays... Well do I have the answer for you! I am loving the nearly perfected recipe for cupcakes I came up with and especially love how well they lend themselves to cranberry upside down cake. Here are the ways to make both with crazy photo-heavy instructions. Have no fear! There are easy to follow instructions at the end. :)

For the cupcakes you are going to need all this good stuff!


If you are going all the way to cranberry upside down cake, you will also need this stuff.


But let's begin with the cupcakes! I'm making a double batch in the photos because I'm going to two different Thanksgiving celebrations. The recipe at the end gives measurements for a single batch, but feel free to make two! Start with eggs.


Add in some salt.


And some baking powder because we want them to be fluffy!


Vanilla cupcakes would be worthless without vanilla, so don't forget to add some of that!


Now my secret weapon in these cupcakes is flax powder. You can absolutely omit this because it adds nothing flavor-wise. All this adds is fiber and possibly a little texture. So add it, or don't. It's your call!


But I always add it!


Then add some milk or soy milk. Whatever you have on hand.


How about some brown sugar?


Oh yes!


Then we need some flour.


And an electric or stand mixer to do the dirty work. I mean c'mon, it's the holidays! No one has time to sit around and mix batter by hand!


If you are making the cranberry upside down cake, you are also going to want to add a little bit of cinnamon and allspice. Heck, you could add them even if you aren't, but please add them if you are!


And finally.... Butter! I'm channeling Paula Deen with this recipe. "Hey y'all! Don't forget to add the butter before you mix it all up!"


If you are just making cupcakes, you would go ahead and spoon that batter into cups and bake them up. You would end up with something that looks like this.
My new go-to cupcake


But if you are shooting for the stars and making cranberry upside down cake, you are not done yet, so hang in there! (Good news: You are nearly done!)

Start with half a stick of butter.


Rub that sucker all over the bottom and sides of your pan.


After the sides are greasy, leave the rest in blobs on the bottom of the pan. This is going to be what cooks the cranberries, so don't be stingy.


Next we need some flavoring for our cranberries. I start with brown sugar, but you could totally use regular sugar. Either way we need to add some cinnamon and allspice. Gosh, allspice sounds so pretentious: "I'm every spice to everyone!" *sigh* ...Whisk it all up.


And sprinkle it over the butter lumps in the bottom of the pan.


Next you add your cranberries. You can use a little more than the recipe calls for, or less, depending on how cranberry-y you want the cake to be.


Then spoon in the luxurious and thick batter!


Spread it out to make it relatively even and bake it!


Once a toothpick comes out clean you can take it out of the oven. It might look something like this.
Cranberry upside down cake

Let it cool for about 30 minutes before you flip it out of the pan! You have to let it cool first so your cranberry ooze has time to absorb into the cake.
Cranberry upside down cake


Not Quite White Vanilla Cupcakes
makes 12 cupcakes or one cranberry upside down cake

½ cup milk (or vanilla soy milk)
1 tsp vanilla
1.5 cups flour
1 cup brown sugar
2 tsp baking powder
3/8 tsp salt
1 stick butter, room temp & cubed
2 eggs
2 tsp flax meal

Preheat oven to 350.
Mix eggs, salt, baking powder, vanilla, flax meal, milk, and brown sugar.
Then add flour.
Then add butter and cream the mixture with hand mixer.
Add to prepared cupcake cups.
Bake 19-23 minutes until toothpick comes out clean.
Frost. 

Cranberry Upside Down Cake
·      4 tablespoons unsalted butter, room temperature
·      1/2 cup sugar
·      1/2 teaspoon ground cinnamon
·      1/4 teaspoon allspice
·      2 cups fresh cranberries

Preheat oven to 350 degrees with rack in center. Rub the bottom and sides of an 8-inch round cake pan (or 9” square) with 2 tablespoons butter, leaving remainder on bottom in chunks.
In a small bowl, whisk together: sugar with the cinnamon and allspice.
Sprinkle mixture evenly over butter chunks in pan; arrange cranberries in a single layer on top.
Prepare a batch of not-quite-white vanilla cupcakes. Add dash of allspice and cinnamon to cake batter.
Spoon batter over cranberries in pan, and smooth top.
Place pan on a baking sheet; bake cake until a toothpick inserted in the center comes out clean, 30 to 35 minutes.
Let cool on a wire rack for 20-30 minutes. Run a knife around edge of cake; invert onto a rimmed platter.